
How to Construct a Felt Pickelhaube
©1996 (print) ©2000 (on the Web) by Mike Gonzales
Web Layout by MW

©1996 (print) ©2000 (on the Web) by Mike Gonzales
Web Layout by MW
|
Since I've been in the hobby I have successfully built three Pickelhaubes, one made to look like a leather helmet with brass furniture, one to resemble a felt helmet with gray metal furniture and my latest a copy of an ersatz canvas covered cork helmet with field gray furniture. All these reproductions had one thing in common; they started off as felt derby hats.
The metamorphosis from derby to Pickelhaube is not difficult, but it is time consuming and labor intensive. If you?ve no patience or eye for detail then perhaps this is not for you. To get started building your Pickelhaube helmet body you will require the following materials: 1.a quality derby hat 2. the templates herewith provided (templates are here as thumbnails at the bottom of the page--simply click on them for a full size template you can print out--or... click HERE) 3.shellac, polyurethane or other stiffener (non-aerosol) 4.button thread, and a heavy duty needle 5.needle nose pliers 6.a good sharp pair of short jawed scissors 7.an Exacto knife 8.white crayon or used piece of soap 9.a piece of light weight leather large enough to cut a liner from. 10.high gloss black latex paint Those of you who are Civil War reenactors no doubt have catalogs from companies who sell reproduction period clothing. One such company is "River Junction Trade Company". Buy yourself a good derby hat, it is important that you purchase the hat at least a full size larger than you wear, size XL if you would normally wear size L, or L if you wear an M...you get the idea. When the hat arrives and you're ready to begin, keep the old carpenter's motto in mind, "measure twice, cut once." First carefully remove the ribbon from the base of the crown, you'll need your Exacto knife for this, start at the "bow" this is where the two ends meet. You'll find this ribbon tacked down every couple of inches or so. Next remove the ribbon from around the bill, be careful not to cut the bill, you are going to need nearly every bit of it! Then remove the sweatband and liner from the interior. With the ribbon removed, look closely at the crown, you'll be able to see where the ribbon pressed the felt flat and left an impression. You'll want to cut the crown off at a point about ¼ of an inch below the top of this impression. With a white crayon or the sharp edge of a nearly used up piece of soap draw a line very carefully around the crown of the hat at that point ¼ inch below the impression. Begin your incision with the Exacto knife--some may wish to use this knife to make the complete cut, or after you have used the knife to make the first hole, you can use the scissors, but pay attention, there's no room for error! There, now you?ve got the body of your Pickelhaube without the visors, which is next (fig. 1). |
|||||||
 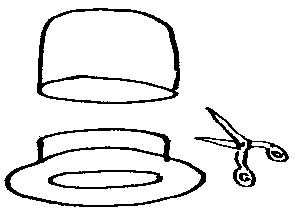
Figure 1 |
|||||||
| The remaining four felt parts, the front visor, the rear visor, and the two side reinforcement pieces, are cut from the bill of the hat. From these instructions [note for web readers: click the thumbnail and print the templates out, then...] cut out the templates for these parts. Press the bill of the hat as flat as possible without crushing it, and with your white marker trace the patterns on the bill. Trace the front visor on the front of the bill, the rear visor on the rear of the bill, and the sidepieces at the sides of the bill (fig. 2) | |||||||
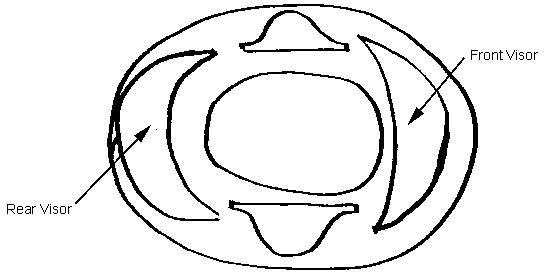
Figure 2 |
|||||||
 Next comes the liner. From a piece of thin, lightweight, brown leather cut out your liner. Measure the outside circumference of the helmet, add ½ inch--that's how long the base of your liner must be. Use a standard hole-punch to make the holes in the fingers through which the string passes. Next comes the liner. From a piece of thin, lightweight, brown leather cut out your liner. Measure the outside circumference of the helmet, add ½ inch--that's how long the base of your liner must be. Use a standard hole-punch to make the holes in the fingers through which the string passes.Click on this thumbnail of the Liner pattern to get the full-size pattern piece. |
|||||||
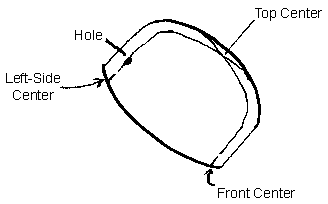 There are two steps you must take before you start putting the pieces together. First, you must accurately divide the body of your helmet into four parts using your white marker. First: determine where the front center and rear center of the helmet are, then the center of each side (fig 3). When you draw lines connecting the front and rear centers, and the side centers, they should cross at the center top of the helmet. Second: cut small holes in the side reinforcement pieces and corresponding small holes in the side of the helmet. These holes mark the locations where the side lugs are mounted There are two steps you must take before you start putting the pieces together. First, you must accurately divide the body of your helmet into four parts using your white marker. First: determine where the front center and rear center of the helmet are, then the center of each side (fig 3). When you draw lines connecting the front and rear centers, and the side centers, they should cross at the center top of the helmet. Second: cut small holes in the side reinforcement pieces and corresponding small holes in the side of the helmet. These holes mark the locations where the side lugs are mounted
Figure 3 |
|||||||
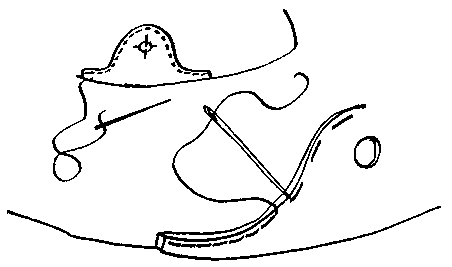
Figure 4 |
All parts must be sewn onto the helmet Some of you out there might just have the talent and sewing machines with narrow enough platforms to allow you to machine sew your parts on, for those of you like me who have neither, the parts must be sewn on by hand. For this task I suggest you go buy some "button thread" which is a thicker, heavier-weight thread than normal, a heavy duty needle with a large enough eye to thread your heavy duty thread through, and a pair of needle nose pliers.
We'll start the assembly with the side pieces. Line them up on the helmet, first one side then the other, and sew them into place taking small stitches, in and out through the two pieces, along the top only. When you reach the end, reverse course going in and out of the same holes, this will create the appearance of a machine stitch. As you do this you'll discover the use of the needle nose pliers, to push the needle through one side, and pull it out the other (fig 4). |
||||||
| After both side-pieces are sewn on, the liner is next. Start with the leather itself, on the reverse side of the leather, along the bottom; draw a line an 1/8th of an inch above the bottom. This is your guideline. Remember, we added a ½ inch to the liner when we measured it? Here's where that comes into play. You'll start at the center mark at the rear of the helmet allotting ¼ inch overlap. Get the picture?
The liner must be sewn on standing upright, on the outside of the helmet with the obverse facing the helmet (fig 5). Thus when sewing is done, it will roll down and tuck inside the helmet covering the bottom edge of the helmet (fig 6). Your stitches must stay right along the guideline you drew or your liner will be uneven. Here your stitches can be as far apart as ¾th of an inch--when you're finished, no one will be able to see them. |
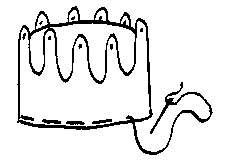 Figure 5 Figure 5
|
||||||
|
Next we attach the visors. This will be a bit tricky. Your liner will be in the way, you must make sure they go on straight across and that they are centered. Additionally the rear visor must end up attached at the correct angle to the body of the helmet so that your rear spine (part of the helmet's furniture) fits. When sewing these parts on, remember they attach just at the top of the lines where it shows outside the helmet, not through it, and remember to reverse you stitch to simulate machine sewing.
|
|||||||
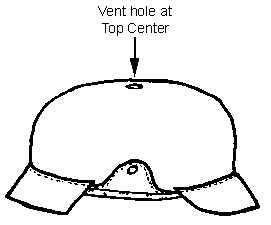
Figure 7 |
You now should have what looks like a Pickelhaube (fig 7). Our next step is to give that flimsy felt same strength--this is done by painting the helmet with either shellac; or polyurethane. Do not use aerosols; they will not permeate the felt! They will only ball-up on the surface. There is another solution which can be purchased at stores that sell sewing supplies called "Stiffy"--however, I personally prefer polyurethane. Whatever you use, either this or shellac, must be allowed to dry for 24 to 36 hours, and the curing takes much longer, a week or two. So, start with the inside, pull the liner down and out of the way then coat the inside. Let this dry a day or so then start on the outside. Before you start to liberally paint the poly on the outside of the helmet, cover the exposed portions of the liner outside the helmet and under the visors with masking tape so as prevent getting the stuff on the leather. Remove the tape as soon as you are done. Again allow the helmet a day or so to dry. | ||||||
| Once dry, give the outside of the helmet a feel, if it's rough, use a light sandpaper or emery cloth on it to smooth it down. Don't press too hard! Then, use a stiff brush to remove as much dust as possible.
Now carefully apply a coat of high gloss black latex paint and let dry. You will have to repeat this step several times until the helmet resembles a lacquered and polished leather German Pickelhaube! [The originals had a very high gloss finish to them] A nice detail is to paint the inside with a lusterless leather brown latex paint (remembering to avoid the leather liner!). If you're going to add original parts to the helmet, remember they are made of a thin metal, which will bend, and break at stress points. Holes can be punched into the finished helmet with punches or an ice pick, then widened to the desired diameter with larger items such as screw drivers. The front visor trim can be glued into place with "Elmer's School Glue,"--this will not hurt the metal parts and can be removed by soaking it in water. It must be remembered that Pickelhaubes were issued in sizes. I remind you of this subtle nuance because the size of the helmet affects the two pieces of its furniture: the rear spine and the front visor. Only the rear spine's size will manifest itself in your construction. I will venture to guess that 99.9% of you have heads larger than size 56, which is the mean size of examples I have observed. This means that when attaching the spine to your helmet from the bottom of the rear visor, which is mandatory (and please note, this will require you to punch a hole in the rear visor for the spine retaining nut and bolt), the top-end in most cases, will not reach to the spike base. You can either cut a slit for the tab and tuck it under, or take a stitch through the tabs hole to hold it in place (fig 8). |
|||||||
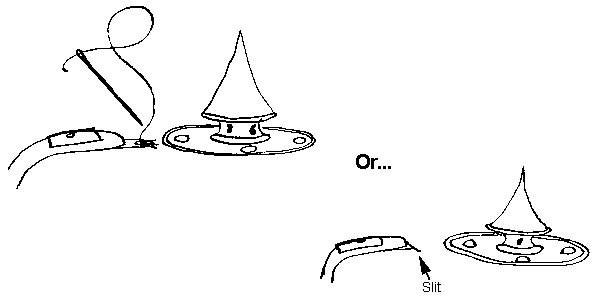
Figure 8 |
|||||||
| So where do you get the parts? Great War Militaria makes some of the necessary parts. There are original helmets out there whose leather parts are rotten and broken or missing, crushed or eaten by mice that will cost you far less than a Pickelhaube in good or restorable condition. It is far better to get the parts individually. I've gotten parts from G.W.M., at gun shows, through Manion's, off eBay and from other members of our hobby--it just requires patience. Please... don't destroy a piece of history in your zeal!
If you've taken your time, paid attention to detail, and used your head as you went, the end result should be impressive, and will last you a long time if taken care of. On that note, Steve Fischer makes a great copy of the Pickelhaube carrying case. If any of you out there know of an at home method to reproduce something, or know someone who does quality reproduction work, give us a write and tell us about your method or the quality reproduction item you've procured. |
|||||||
|
|||||||